| www.ScrantonStation.com |
    |
| DCC |
|
|
DCC And Related ThoughtsUsing your Laptop Wirelessly With Digitrax's DCCI have had my laptop connected to the Digitrax DCC command station ever since I first went to DCC and then purchased a LocoBuffer-USB. The latter allows you to connect the LocoNet to it on one side and your computer, via USB on the other. Then you use software like JMRI/Decoder Pro and LocoNet Checker to monitor and/or control your layout. The Decoder Pro is especially useful for configuring the CV values in decoders using a plain English user interface. Well, I got to thinking that it makes no sense to have a laptop and then have it permanently connected to the layout. The idea of a laptop is that it is not connected to anything. The layout is in the basement, as is my office. In my office, I have a number of servers that run permanently for business purposes, all featuring mirrored disk drives and controlled with uninterruptable power supplies with battery backups. It seemed obvious that if I could connect the LocoBuffer-USB to one of those and then connect that server to the LocoNet, then I could leverage my wireless network to connect the laptop to the server and from there to the LocoNet. I had the laptop, I had the wireless network and I had the LocoBuffer-USB. There were two missing pieces:
Fortunately the solution to both of these was very easy: For server software, there are (at least) two choices, with both of these being free and supported by the JMRI software.
I chose the LbServer. It makes the most sense to me for a server process. After installing the LocoBuffer-USB into a USB port and loading the device driver software so that the device looks like a COM port on the computer (in my case COM4), you start the LbServer process specifying the COM port of the LocoBuffer-USB and the local local port on which it will listen for connections from clients (meaning from computers running JMRI). I've set up a shortcut that runs in the startup group on the Windows-XP computer (not a real server, but I wanted to do a proof-of-concept before trying to see if it runs on Windows 2003 server. There I will have it run as a service (there are many pieces of software that allow a standard process to run as a service) so that it is available 24x7. The connection between the server and the LocoNet turned out to be really easy:
I was finally free from the tethered existence. I could have my laptop anywhere (in fact I have the JMRI installed on two), I could also have any networked desktops and/or servers be JMRI clients too. In fact, any computer could now run the layout. While I was at it, I moved my custom decoder files plus my DecoderPro roster from the laptop to a network drive location and changed the JMRI configuration accordingly. One last thought is that, since one of my servers is exposed to the Internet, if I ran the LbServer on that one and opened up a port for it to use on my firewall, I could control the layout from anywhere. All, I'd need would be a few webcams around the layout. One use of this would be to break trains in on my test loop while I am away working. But, of course, to the designers of LocoNet and the implementers of JMRI, all of this is as expected. Here is a schematic of how it all is connected: 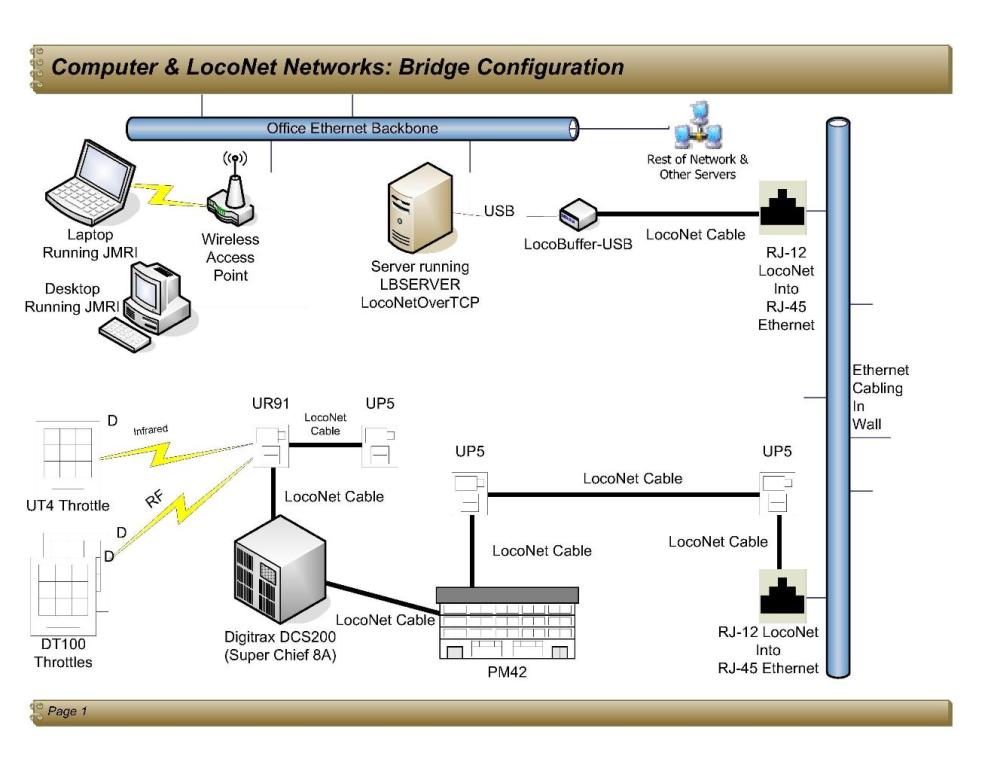
|
|